How To: Creating a powerful portrait from start to finish – Photoshop Makeover

Creating a striking portrait is teamwork. It’s about mastering the lighting, having a talent who’s able to convey your vision and the ability to put the talent in the right mind state.Finally, using the right editing techniques is key to achieve the result that you want in the end.
1. Light Setup

This light setup is pretty straightforward. It combines traditional butterfly lighting with the beauty dish just overhead of the model and two back lights very close for more contrast that will be used as hair light and to highlight the jaw line symmetrically. Having the main light around 1 feet from the model makes for a more contrast yet a very soft look. The diffusion sock on the beauty dish makes it like a round softbox.
If you are curious about this lighting, please go and check Joel Grimes tutorial here. Joel is an amazing commercial photographer from Arizona who creates stunning portraits using cutting edge techniques.
2. the shoot
Once the lighting is ready, time to bring the model. In that particular example, it wasn’t really a planned portrait session. Brent happened to drop by the studio. We chatted a little bit and I asked him if he’d like me to take a few shots of him. Brent is a unique character and I wanted to bring the intensity he had in him in the photo. As it happens sometimes, the first photo taken was the best one and the photoshoot lasted barely 5min! Having rapport with the model and making him/her extremely comfortable quickly is a key aspect of a successful portrait.
3. the editing
For that particular photo, I wanted to create an edgy look with contrast that matched the lighting.
So before going into details, here is the accelerated video of how I did this portrait in Photoshop. In real-time, getting this result took 37 minutes.
Just before I explain more into depth, I’d like to mention that all my editing is done using a Wacom Tablet (Intuos 3 – 9×12″ around 500$ or Intuos 4 – 4×6″ around 200$). If you think you’ll spend a lot of time editing, get one. Some models from Wacom are really cheap. Tthe tablet gives you the ability to map the opacity or thickness of the brush depending on the pressure and/or the angle of the pen. It’s really really powerful!
Now, the workflow I use is pretty straightforward
Step 1 – Removal of skin blemishes (done in Adobe Camera Raw – not shown here)
Step 2 -Removal of skin imperfections, small hair, red veins in the eyes. I use a lot the healing brush and the clone stamp (mostly in lighten mode to soften shadows).
Step 3 – Eye editing. I like to add a bit more light and contrast, the amount depending on the type of portrait done. It’s done using curves adjustment layers and using screen bending mode to lighten and soft light to add contrast.
Step 4 – Contouring. Contouring is a form of dodging and burning to create shape and highlight face features in a portrait. It’s done using curves adjustments layers and switching blending modes to screen (to lighten) and multiply (to darken).
Step 5 – General curves adjustments. I use levels and curves adjustment layers and a mask based on channels luminosities to affect mostly shadows and midtones and not highlights.
Step 6 – Tonal contrast adjustment. In this example, it’s done using a black and white adjustment layer and using the soft light blending mode. Using high pass sharpening helps also bring more contrast.
Step 7 – Sharpening. In this example, high pass sharpening was used.
The core of the workflow does not change. It’s pretty straightforward.
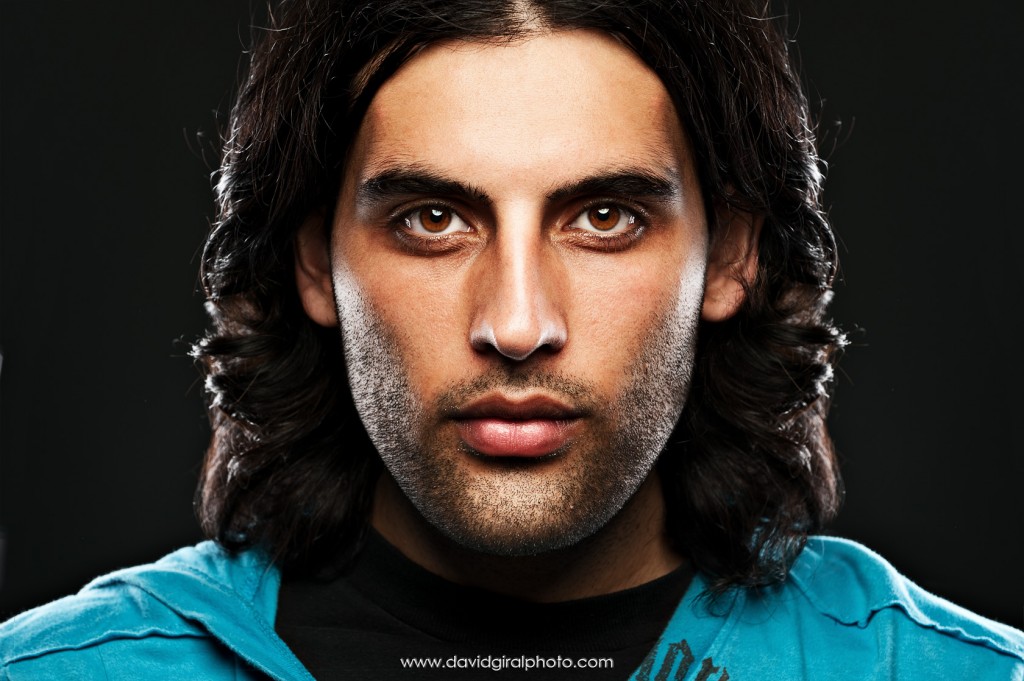
4. the final result
Here is the final image, with a few corrections compared to the end image of the video.
Thanks for viewing!
Eric
Trés bon tuto David, vraiment trés instructif comme à chaque fois
Rajesh J Taylor
Great headshot. I had the pleasure of taking one of Joel Grimes workshops when he travelled to London in October 2010. He was a pleasure to learn from. I see you have put his edgy and dramatic 3 light setup to good affect.
Will you be producing another image with this set-up soon or overlaying this image in front of a HDR image? This is something I am learning.
Kind regards,
Rajesh J Taylor.