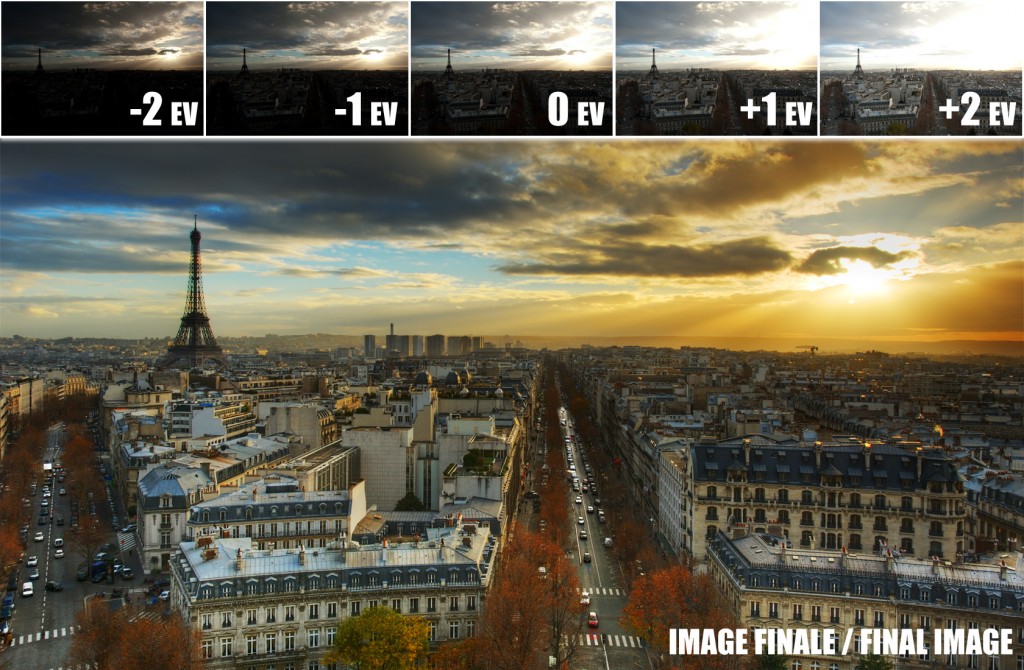
What is HDR?
HDR is the art of blending different exposures to obtain an image with the complete dynamic range, from the deepest shadows to the brightest highlights with maximum detail. HDR is the only technique that tries to replicate what a human eye sees and that no camera or monitor can reproduce yet.

HDR is also the art of creating local tonal contrast to create spectacular images with amazing depth.
Here are some examples of HDR images captured all over the world:
[slidepress gallery=’hdr’]
What are the techniques available for HDR?
Several methods exist to combine HDR images depending on the projected outcome:
- Blending the images in Photoshop either manually or via advanced techniques of masking.
- Blending the images in Photoshop using the “Merge to HDR Pro”
- Blending the images in a dedicated HDR application such as (Photomatix, HDR Express, Oloneo PhotoEngine)
It’s also possible to blend the different results of HDR tonemapping using Photoshop to botain a unique image and finishing up with contrast and color adjustments in the image.
During the workshop you will learn how to use each technique depending on the situation.
Why do I need to learn HDR?
Mastering HDR is a skill very useful in different types of photography such as:
- landscape photography: HDR is the best technique to capture sunsets, seascapes and other high contrast scenes. It can replace having to use a ND grad filter.
- Architecture Photography: HDR is the ideal method to capture the whole dynamic range of interiors and exteriors.
- Fine Art Photography: Tonemapping or local contrast management will allow you to be more creative with your pictures and create scenes that look really real or unreal by adding a tri-dimensional effect that will captivate the viewer.
Learning several approaches of HDR will also give you more flexibility in your creative process and will help you create the right images for your clients.
What’s the workshop’s schedule?
Day 1: Outdoor photography: Locations will be planned and approved by attendees. 3-5 locations will be used during the workshop.
If there is rain during the worksgop, a 15% discount will be applied on the price of the workshop. The photography part of the workshop will take place in covered areas.
Day 2 : HDR workflow in classroom. This part of the workshop will feature planned HDR projects using my images and HDR projects using YOUR images.
What are the pre-requisites of this workshop?
Camera
For this workshop, it’s highly suggested to know how your camera works and if it allows bracketting (e.g. taking pictures with different exposures). Contact me if you want me to help you choosing your camera.
It’s also advised to know how to use the manual mode on your camera.
Principles of digital photography
You should have a good understanding of the histogram. You may read this to update your knowledge of the histogram.
Photoshop Versions
it’s highly suggested to own a version of Photoshop CS5. A trial version is available here and I would suggest to download it a few days before the workshop. For PC owners, I would highly suggest downloading the beta of Oloneo PhotoEngine. This new HDR software is the best application in its category (see upcoming review) I ever tested and one of the two products I recommend with Photomatix. For Mac owners, I would suggest using Photomatix.
Photoshop
Level: intermediary/advanced
It’s assumed that for this workshop that you master the following aspects of Photoshop:
- shortcuts: I would suggest reading this document summarizing Photoshop shortcuts.
- Curves, levels, menus and panels: you have to know how to use those elements and have used them a few timesé
- layers: you have a good understanding of how they work.
- masks: you have a basic understanding of how they work.
- mode de fusion: you have to know they exist.
Video tutorials will be available for attendees once their payment is confirmed.
What do I know to bring?
For this workshop you will need:
- your camera
- a wide angle and a standard zoom
- a comfortable photo bag
- a tripod
- a remote cable
- a laptop supporting CS4 or CS5 with 2Gb of RAM minimum
Which accessories do you recommend?
Even if it’s not mandatory, I would suggest to consider the investment in the following items:
- Promote control: This tool is the best product available to allow you to bracket beyond your camera’s official specifications.
- bubble level: the best thing to allow you to check if your camera is straight. Very easy to find on Ebay.
- tablet: a wacom tablet is highly suggested to allow you to edit your pictures more easily and blend different HDR exposures.With my laptop I use the Wacom Intuos 4 small tablet.
What is the course outline?
- Principles of HDR
- Details of the different workflows
- Processing of images in HDR software (Photoshop, PhotoEngine and Photomatix)
- Blending inPhotoshop
- basic techniques (layers with simple masks)
- advanced techniques (layers with complex masks)
- sharpening and tonal contrast
- special effects
What’s on the DVD of the workshop?
A DVD will be handed to you at the end of the workshop and will contain
- 2h30 of training videos with commentary
- HDR projects using Photoshop, PhotoEngine and Photomatix.
- techniques (straightening, tonal contrast, mask management)
- effects (B&W, sepia, texture, composites, etc…)
- shortcuts pdfs
- textures
- Hubble images
- trial versions of HDR software with rebates (MAC et PC)

