Software Review: Oloneo PhotoEngine (vs Photomatix)
At the time of this post, Oloneo PhotoEngine is very close to its release and for those of you who are on the fence on buying it, I thought this review would help you make up your mind.
This review will be updated when the final version is out and corrected (yes there are hidden spell-check errors, email me when you find them) if necessary.
A little history of HDR
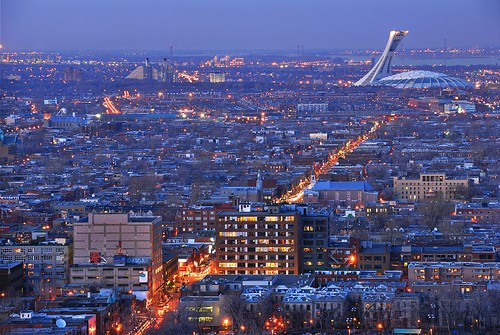
HDR is nothing new to me as I’ve been using mostly Photomatix since 2006. My first HDR, a view of Montreal at dusk was published on Flickr in March 2006. Some of my HDRs have been published in magazines and other publications.
What I love about HDR is both its ability
- to recover the dynamic range observed even in tough conditions and also
- to make the scene more real and contrasted than what the camera captured through tonemapping. That ability to create stunning details through micro-contrast management can be replicated in Photoshop, however it takes far more time.
Since then I’ve tonemapped more than a thousand HDR using various techniques like:
- semi-automatic blending of different layers using masks in Photoshop: one of my favorite techniques for blue hour HDRs.
- Photomatix: Even though it was an good starting point, Photomatix never gave me results close to what I really wanted and I’ve always had to go through a series of adjustments in Photoshop to get the result that I wanted. Color accuracy and clipping was always an issue in Photomatix especially if you increased saturation to a value of more than 40.
- Photoshop Merge to HDR: more realistic however it’s still not intuitive enough and certainly very slow.
- 32-Float and HDR Expose: colors are accurate and results can be interesting and quite realistic however both applications are a bit challenging to understand and processing is a bit slow.
- HDR Express: better than the previous ones from Unified Color but still a bit slow for a professionnal workflow.
- HDR Efex Pro: good enough for enthusiasts, not really geared towards professionals. Color efex and Sharpener are much better applications from the Nik firm.
When you work as full time photographer, having an efficient workflow is key to delivering your clients quickly (especially for those working in real estate photography) with predictable quality in the results.
Unfortunately, none of these applications are really efficient enough for professionals and all of them lack the following qualities:
- a halo-free image with accurate colors that is very close to the final result to be delivered to a client (e.g. realistic)
- good ergonomy, quick and easy to navigate through
- real time visualization (when modifying settings)
- predictable results (for batch operations)
- quick processing
Oloneo PhotoEngine and how I fell in love with an HDR application
One of my obsessions as a professional photographer is having the most efficient workflow and clients expect more and more to be delivered quickly in the digital age (especially in real estate photography). Having worked in test automation for 5 years, I had already started to create actions in Photoshop to improve my workflow. Then I started to model my workflow to make it more efficient.
I was also looking for an application that would give me the result I wanted straight out of HDR processing. This was never really the case with any of the applications that I’ve used. Photomatix is amazing for artistic stuff, not so much for professional use. Then, after browsing flickr forums, I ended up on the mention of Oloneo PhotoEngine.
I then installed the application and within 5 minutes, I was already playing with it. This was a revelation to say the least. The application, while still in beta, was impressive and the results were nothing less than spectacular and it took me barely 15 minutes to figure out MY base settings. Processing an HDR from start to finish took me less than 5 minutes (that was before it was possible to save presets).
Here is one of the first picture to come out of the application:

With the latest beta, it’s possible to create an HDR from start to finish in less than two minutes, as you will see later.
About Oloneo SAS and Oloneo PhotoEngine
Oloneo is a french firm established in Paris a few hundred meters from the Eiffel tower and founded in 2006. The team, led by Antoine Clappier, has been working on Oloneo PhotoEngine since its beginnings and after communicating with them, they’re clearly out there to help bring HDR to the next step using their previous experience in the Silicone Valley to the table and by listening to the needs of both enthusiasts and professionals.
A gimmick for a long time and the target of lots of hate from old school photographers, HDR is now getting increasingly used by professional photographers and with its efficiency and its consistent results, the application will certainly appeal to a lot of pros and enthusiasts who are looking for crisp, sharp and realistic HDR images.
High Dynamic re-exposure in real-time
Deeply re-expose pictures in a fully real time, 32-bit per channel (96-bit per pixel), ultra-wide gamut and full resolution high dynamic re-exposure module without compromising details and color appearance.
Main features (HDR Tonemap)
- Full real time controls.
- Four high-end tone mapping engines:
- Auto Tone Mapper
- Local Tone Mapper
- Advanced Local Tone Mapper
- Global Tone Mapper
- Natural HDR™ processing mode.
- Auto-exposure correction with fine-tuning.
- Auto-contrast.
- Detail size and threshold controls.
- Halo control.
- Ghost removal.
- Over 40 factory presets + user presets.
- Batch processing.
- EXIF preservation.
- Full color management with display calibration support.
- Edge sharpening.
- Auto-align and auto orientation, and more.
The test setup
As described below, the testing computer is a PC:
- Intel Core2Duo E6750@2.33GHz
- 8Gb RAM
- 750Gb system hard drive
- Windows 7 64 bits
- video card GeForce GTX275.

the interface
the browser
There is definitely some room for improvement here. The button to open the browser is a bit difficult to locate at first.
Once you get used to it, it’s easy to select your files and add them for processing with HDR ToneMap.

Right now the only application that manages alignment correctly is the load files into stack from Photoshop CS3-5. PhotoEngine gives weak results
Editing (HDR ToneMap)
This review focuses on the core of the application which is HDR ToneMap. HDR ReLight and HDR DeNoise will be discussed later. Also, no manual or documentation was used for this review. It reflects how I understood the settings based on my own experience of HDR software.

The HDR ToneMap is very intuitive and is reminiscent of Photoshop. The placement of the different panels is (pretty much) based on the sequence you’ll be using them.
The histogram is always visible and is the best indicator for feedback to show you if you’ve clipped highlights or colors and if your exposure is correct.
The terminology in the interface is rather easy to understand and here is my understanding of some of the main terms used for the local and advanced local tonemapping.
It’s also possible to enter a numeric value manually, which is very useful if you want to use presets.
High Dynamic Tone Mapping box
TM Strength: strength of HDR. it’s pretty much the main slider for the tone mapping.
Detail Strength: increase edge contrast (value between 0 and 20 recommended for realistic images).
Exposure: pretty self explanatory, the fine exposure comes in handy for minor adjustments between -1 and 1 ev.
Contrast: pretty self explanatory
ADVANCED OPTIONS
Detail Size: adjusting this setting changes the way micro-contrast is handled
Detail Threshold: adjusting this setting changes the way micro-contrast is handled. When close to zero, it removes halos altogether, when pushed to maximum, it participates to create the grunge effect. it works a bit like high radius high pass sharpening in Photoshop.
Edge Sharpen: adjust edge contrast (very subtle adjustments)
natural HDR mode
enable: this checkbox is VERY useful to retain original hue and saturation values of colors.
Low Dynamic range: those are adjustments to be used if you’re not using the High Dynamic Tone Mapping box
Exposure: pretty self explanatory
Brightness: pretty self explanatory
Contrast: pretty self explanatory
White balanced adjustments (temperature and tint): very useful and easy to use for ajusting color balance in the image.
Photographic print toning: useful and interesting for toning and split toning (highlights and shadows)
Advanced: those are adjustments are useful for finetuning the final image, especially brightness and saturation curves adjustments.
Brightness/Brightness: Curves adjustments to increase or decrease luminosity without increasing saturation. This adjustment works a bit like the curves adjustments in luminosity mode in Photoshop.
Saturation/Saturation: Curves adjustments to increase or decrease saturation based on original saturation value.
Hue/Saturation: Adjusts saturation based on hue
Hue/Luminance: Adjusts Luminance based on hue.
Hue/Hue: Adjusts Hue based on hue.
Time Machine: works like a history and it’s possible to save versions and compare different tone mapping settings instantly. VERY useful!
Presets: this is a lifesaver. Makes it easy to create and visualize different tonemappings instantly.
ghost removal
I’ve tested the settings a few times with images containing car light trails and moving people and both Photomatix and PhotoEngine failed to create a passable image.
real time tonemapping
The first thing that you will notice when you start working with PhotoEngine is that the image (and histogram) is updated in real time while you adjust your settings. Most software display the results once you’ve released your mouse button (it takes 3-4 seconds for photomatix to update a 1/4th size preview) and all HDR applications and it makes more difficult to compare two tonemapping results. It’s also possible to view at 100% the final result for one simple reason, the tonemapping is REAL TIME. Click save and you’re done.
That alone is great, however Oloneo PhotoEngine doesn’t stop there; the “time machine” also allows you to create several versions of tonemapping and make it easy on you to compare them real time (without any lag).
One major difference, compared to Photomatix is that the preview IS the final result. It was a bit of a surprise to see that there was a difference between the Photomatix Preview and the final result like shown below:

Let’s be clear, for tonemapping, the local tone mapper is what you want to use
For experienced HDR users, the local tone mapper and advanced local tone mapper are the tone mapping options you’ll use the most. The advanced tone mapper allows for complete halo control for scenes with very high dynamic range.
For a good workflow, I would suggest using the settings in that order:
- TM Strength: makes the HDR more or less pronounced. A value of 40-60 gives a natural feel to the image. The HDR becomes “inverted” between 80-100.
- Detail strength: controls general micro contrast. A value between 0-20 works well for creating subtle edge contrast.
- fine exposure: corrects exposure with small increments. When you push the TM strength, it’s advised to lower this value.
- Detail threshold: manages tonal contrast and lowering the value will remove halos altogether. A value between 80-120 usually works well
- enable natural HDR mode: keeps colors looking natural and avoid strong color shifts. Disable it for artistic HDRs.
- white balance: with HDR processing, color casts become more apparent, use the temperature slider to make the image more blue or orange and tint to make it more green or purple.
- Brightness/Brightness: if you wish to add a bit more contrast, create a S curve.
- create preset: once all is done, save a preset and use it for future images.
Comparing Photomatix and PhotoEngine HDR ToneMap
Workflow
Here are two videos comparing my workflow to obtain a similar result.
To keep the test fair, Photomatix settings were at default and a preset was loaded. For Oloneo PhotoEngine, the browser was opened and the previews preloaded before the test was started.
Photomatix speed test from David Giral on Vimeo.
Oloneo PhotoEngine speed test from David Giral on Vimeo.
Speed test results
For this test, I used 7 RAW files from a Nikon D700, 7 TIF 16 bits and 7 jpegs high quality as input.
Auto align and ghost removal settings were disabled in Oloneo PhotoEngine.
Reduced ghosting artefacts, reduce noise, align images and reduce chromatic aberrations settings were disabled in Photomatix 4 64Bits.
| test performed | Photomatix | PhotoEngine |
|
16 bits TIF workflow
|
||
| Loading 7 TIF files (12Mpixels) | 42s | 7s |
| loading a preset | 4s | 1s |
| tonemapping | 15s | 0s |
| saving | 4s | 3s |
| TOTAL time TIF 16 bits | 65s | 12s |
|
8 bits JPEG workflow (quality 8 )
|
||
| Loading 7 JPEG files (12Mpixels) | 15s | 7s |
| loading a preset | 4s | 1s |
| tonemapping | 15s | 0s |
| saving | 4s | 3s |
| TOTAL time jpeg | 38s | 12s |
|
Compressed NEF files workflow
|
||
| loading 7 RAW files (12Mpixels) | 42s | 38s |
| loading a preset | 4s | 1s |
| tonemapping | 15s | 0s |
| saving | 4s | 3s |
| TOTAL time RAW | 65s | 42s |
a few comments:
- Tonemapping in PhotoEngine is real time. I rounded the time for loading the preset at 1s for PhotoEngine, however it’s much closer to 0s than 1s.
- Photomatix takes 2-4s to display the tonemapping result once the processing is over. This time is included in the 15s.
- Tonemapping time in Photomatix is the time that Photomatix takes to display the final image in the application before saving step.
As we can see in the results, the only part where PhotoEngine struggles is with RAW conversion of the compressed Nikon files.
In a professional workflow, it’s highly suggested to correct distortion and vignetting and chromatic aberrations using a dedicated RAW developer and use jpegs and TIFF without curves being applied in camera.
In those situations, using JPEGs and TIFs, PhotoEngine is miles away from Photomatix.
PhotoEngine is a clear winner here.
Image quality
For this example, because the two applications work differently, I did my best to get a the best image I would use and histogram using the two applications, however Photomatix doesn’t allow general contrast management without having to clip the highlights adjusting the white point so results are a bit different.
Images are straight of Photomatix and Oloneo PhotoEngine WITH the same input files and WITHOUT any adjustments in Photoshop.
Please check both slideshows to see which one you like better.
Paris Sunset HDR
[slidepress gallery=’hdr-paris-test’]
Click icon to the lower right to view in full screen.
Night NYC HDR
[slidepress gallery=’hdr-nyc-test’]
Click icon to the lower right to view in full screen.
Overall quality: as you can see in the examples, Photomatix seems to apply a blur on the image and lacks local contrast compared to the PhotoEngine image. Honestly, I like the Photomatix version for artistic work, the gaussian blur gives a bit of a dreamy look to the image. PhotoEngine image is much more detailed and sharp. It stands out in term of precision of the adjustments and normal processing is pretty much halo-free. The resulting image is looks much more appealing to professionals and barely needs more adjustments in Photoshop.
Conclusion: Oloneo PhotoEngine vs Photomatix
I like Photomatix for artistic HDR when I’m looking for a dreamy and artistic look. I will always tend to heavily post-process this image in Photoshop.
I like PhotoEngine for my realistic HDR and when I have to deliver my clients quickly. The resulting image seldom needs more adjustments in Photoshop, except if you wish to do heavy post-processing anyway.
If you have the budget for both, you’ll get the best of both world by buying both. If you own a PC and look to invest in THE most efficient solution for a good price, I would strongly suggest PhotoEngine.
Verdict
Whether you’re a professional photographer looking to cut down on his editing time and improve his workflow dramatically or an enthusiast photographer looking to create natural looking HDR images effortlessly then stop looking. PhotoEngine is clearly miles ahead of the competition and manages to create stunningly sharp and incredibly detailed images efficiently in just a couple of minutes.
+ : incredibly efficient
+ : easy to use
+ : real time tone mapping
+ : natural looking and halo-free images with accurate colors
+: stable (tested on Win 7 64 Bits)
– : not available on MAC yet
– : subpar image alignment in current beta
sample images


David Giral is a published Montreal/Toronto based editorial and commercial professional photographer specialized in architecture, interiors, portrait and travel photography.
Blog | Flickr | Twitter | Facebook | Google+ | LinkedIn | Email
Text, photographs, and other media are © Copyright David Giral (or others when indicated) and are not in the public domain and may not be used on websites, blogs, or in other media without permission from David Giral.
alex
About ghost removal: Photomatix can do semi-automatic removal. That will let you manually select ghosted areas and will remove them properly afterwards.
That’s very important to me, but obviously doesn’t work with batch processing.
Kelly Bellis
Great write up Dave! Excellent work.
Thank you for sharing.
Kind regards,
Kelly
Name
David
Very informative assessment of Oloneo, I hope they get the bugs out of the ghost removal this is a great program and have been using it since it’s first release.
Rollo
Richard Sisk
This is an excellent review of Oloneo! I will put a link to it on my HDR info site:http://hdr360pro.com/
Eric Miner
I don’t think you gave the Unified Color products much of a chance. For me the only real challenge to them was the realization that when using them you’re working directly on the 32bit floating bit data of real HDRI. As for being ‘slower’ well when you’re working with magnitudes more data it does but a bit of a load on the CPU and RAM. In my old quad core 3Gig box it was a little slower. Now that I have a better PC it is extremely fast. If you’re after ‘realistic’ HDR images I strongly suggest you try HDR Expose again. I’ve been shooting HDRs for over 5 years and for the last two years I haven’t used any tone-mapping at all. Working in a 32bit workflow is very liberating, plus it give you full control as opposed to very limited possibilaties that tone-mapping operators can offer.
Just my opinion.
admin
You’re right, I’ll add more about HDR Expose.
Although, with TIF and RGB I have been having weird artefact and although they are really amazing people to work with, the answer they came up with wasn’t satisfactory enough for me.
Efficiency is key when you’re a pro in photography.
Outsource Software Development
Thanks for useful information and informative review, well done.
Pingback: Exploring New-York City : “Making Of” The Lexus on Broadway Avenue | Editorial landscape, travel, architecture and portrait photography | Professional Photography tips | David Giral Photography Blog
Adam
Great photos!
Which HDR software do you use now for interiors?
admin
I seldom use HDR software for interiors, and when I do, I use Oloneo PhotoEngine.